Troubleshooting with Gauges FAQ
A visitor comes to us with questions about what might be wrong with the a/c in their car. It goes something like this. My air conditioning was working last week, and then it quit working. What do you think is wrong? Or, maybe something like this... I added some refrigerant to my car, and it still won't get cold. What could be wrong? Well, unfortunately, questions like that are almost impossible to answer without detailed information. That's where the manifold gauge set comes into play. We use a manifold gauge set to get more information about what's happening inside the system. We created this FAQ to help answer some of the most common questions we receive on using a gauge set and hopefully provide some explanation on pressure readings.
As a prerequisite, anyone interested in learning how to use a gauge set should first take a few moments to learn how the refrigeration cycle works and understand how refrigerant flows through the system. This in itself will help you immensely when it comes time to identify the high and low side of the system. You'll also begin to understand the role pressure plays on different parts of the system. That's important, since the gauge set is used to measure pressure within the system.
The basic manifold gauge set

The basic manifold gauge set usually has three hoses. Two hose will be attached to the service ports on the vehicle during service. Each hose has its own identifying color. In most cases, the hose intended for the low pressure service port is blue, and the hose intended for the high pressure service port is red. The middle hose should be yellow. That yellow hose will be attached to the refrigerant cylinder while charging or the vacuum pump when the system is being evacuated of air and moisture. Your manifold gauge set should have a corresponding gauge and control knob for each of the two service hoses. Like the color of the hose, the gauges and control knobs will usually be colored to indicate high or low pressure.
What are all the numbers on the high and low side gauge?
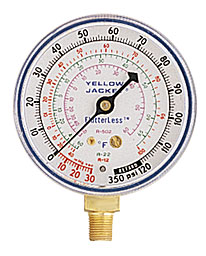
The low side pressure gauge is called a compound gauge. That means it can be used to measure pressure or vacuum. The numbers around the outside of this gauge indicate pressure in pounds per square inch (PSIG), and the numbers near the bottom indicate vacuum in inches of mercury. The smaller scales near the middle of the gauge list the temperature relationship of different refrigerants. The gauges pictured here lists the temperature of R12, R22, and R502. Regardless of which refrigerant is being used, the scale designated as PSI is the one used to read system pressures when charging and diagnosing an a/c system. The working pressure of this gauge is from 0 to 120 PSI.
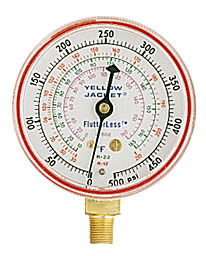
The red, high side gauge is used to measure the high pressure side of the a/c system. This gauge has no markings that indicate vacuum. It reads positive pressure only. The working pressure of this gauge is also much higher than the low side gauge. Notice the scale on this high side gauge reads from 0 to 500 PSI
I hooked up the service hoses with the car turned off. Both gauges show pressure. What does this mean?
The pressure readings you see when the a/c system is not operating is called static pressure. When the system is off, and temperature is stable, the pressure you see on both the high and low side gauges should be the same, or very close. Both the high and low side of the system have equalized.
What static pressure should I expect to see when I hook up my gauge set.
Each refrigerant has it's own static pressure at every corresponding degree in temperature. The important thing to keep in mind is static pressure changes based on temperature. Any change of temperature brings with it a change of pressure. The greater the temperature, the greater the pressure. You can use a refrigerant pressure chart to find static pressures at various temperatures. Static pressure will not be used to determine if a system is fully charged. Using the chart below, if the R-134a system has a static pressure of 88 psi at 80 degrees F., we can then assume the system has some amount of liquid refrigerant. The system may be full -or - may not be. At the same temperature, if the system showed only 75 psi, we could say with confidence, the system is low. This is because static pressures shown on a temperature chart would show inadequate pressure for the presence of any liquid refrigerant.
<pressure chart> - Coming soon
Can I tell if the system is full with a static pressure reading?
No. We might determine if there is liquid refrigerant in the system, but we won't be able to tell how much liquid it contains. For example, a thirty pound can of refrigerant will show the same pressure whether it has thirty pounds in it or if it only has 1 ounce. With static pressure, you will only know if the system has some amount of liquid refrigerant present.
What good is a static pressure reading then?
With our initial pressure reading, we can tell if the system has enough pressure to satisfy the low pressure switch and enable the compressor to operate. Static pressure is used to determine if a jug of refrigerant is contaminated with air. Static pressure can also be used to determine if a system has enough pressure to begin leak testing. Your static pressure should be no lower than 50 psi when leak testing.
What's the minimum static pressure I need for the compressor to operate?
Most systems will have a low pressure cut off switch that turns the system off at approximately 20 psi. The compressor will not function again until the pressure reaches approximately 45 psi. So, In most cases, you will need a static pressure of at least 45 psi before you begin to see the compressor operate.
Can I test the system with only 45 psi?
You can begin testing with only 45 psi. You won't get any cold air, but you should should start to see some compressor engagement. As soon as the compressor engages, it will cycle off rather quickly when the suction side of the compressor draws the pressure on the low side below 20 psi.. You will see the low side gauge at 45 psi, drop quickly to 20 psi, at which point the compressor will cycle off. Then the low side gauge will climb back up to 45 psi as the high and low side equalize. At this point, he compressor will kick back on and the cycle will repeat itself. This is called short cycling. This rapid cycling of the compressor is a good indication that the system is low of refrigerant.
When charging, what should my low and high side pressure be?
Ah, this is the most asked question there is. There is no magic answer for this question though. There are too many variables. Compressor (engine) RPM and airflow across the condenser are always changing, thus engine speed is always affecting pressure. System design, blower speed, mode setting, refrigerant type, all cause variance in high and low side pressure. For this reason we simply can't say 30 on the low side and 200 on the high side. Though I might add, that's about where you'll usually end up. The reason 30 psi on the low side is just about right is because that translates into an evaporator temperature somewhere around the freezing point of water. Look at your low side R12 gauge and you'll see a temperature scale right next to your pressure scale. That low side pressure translates into evaporator temperature. Since moisture collects on the evaporator, we would like to keep the evaporator temperature slightly above the freezing point. R134a low side pressure will be be slightly lower (27 PSI) at this temperature. Again, refrigerant type is one of those variables we have to consider.
What should the high side pressure be?
With R12 systems, high side pressure is usually 1.8 to 2.1 times ambient temperature. That means on an 80 degree day, with moderate humidity, we would expect to see between 144 to 168 PSI on the high side. On hot humid days (with R12), you could say ambient temperature plus 100 PSI., and be pretty close.
With R134a it's common to see high side pressure between 2.2 and 2.5 times ambient temperature. On that same 80 degree day we would see between 176 and 200 PSI on the high side of an R134a system. The system operates in a specific range based on outside ambient temperature. High side pressure has a broad range relative to temperature because of heat load on the evaporator, humudity, airflow across the condenser, and engine speed.
Should I test with doors open or closed, high idle, blower on high or low?
We should measure high and low side pressure at stable engine speeds. This can be done at engine speeds just slightly above idle. 1,200 to 1,500 RPM is most often recommended. On front wheel drive cars, never rev the engine or hold the engine at high RPM while charging or checking pressures. This can create dangerous high pressure. This is because electric condenser fans are fixed in speed, and will not compensate for high engine RPM. The same holds true on rear wheel drive cars with engine driven fans. A defective fan clutch could cause pressures to reach dangerous levels at higher engine RPM.
We like to test with the system in MAX position on high blower with doors closed. Windows can be open. MAX (recirculate) mode is preferred since we'll need to have the hood up while charging and testing. In fresh air mode, hot engine heat can be drawn into the fresh air cowl under the wiper blades. Same reason we would like to test with doors closed. We would like to keep engine and exhaust heat from causing abnormal heat load on the evaporator. We're not bothered by having the windows down, since this helps create a typical and stable heat load. And it's easy to reach in and feel how cold the vent temps are getting.
Testing should be done with blower speed on high. Low blower speed will reduce heat load on the evaporator to the point where compressor cycling can occur. We want nice stable conditions when testing. When needed, low blower speed can be used to force low side pressure down during testing and adjustment of compressor cut-out pressure.
If 30 PSI is a good low side pressure, then why isn't the system cooling?
Well, there are a couple reasons, but let's look at the most common. Let's take the fixed orifice tube system for example. You can have a system evaporator pressure of 30 psi, and still be low on refrigerant. Let's assume that only half the evaporator is full of boiling, heat removing, liquid refrigerant. Only half the air traveling through the coil is being cooled. Pressure readings indicate core temperature is near thirty degrees, but half the core isn't removing any heat. The system is close to being full, but that discharge air is only slightly cool. On the fixed orifice tube system, most people will charge until the inlet of the evaporator, and the outlet of the evaporator are within a degree or two of each other. That indicates the quantity of refrigerant is enough that the entire coil is being used. At this point, the boiling liquid will spill into the accumulator, thus the outlet tube will be very cold. If the system has a TXV or H block, you will not be able to charge by feeling the evaporator outlet tube like we can on a FOT system. The TXV is very efficient and is designed to tightly control liquid refrigerant from spilling out of the evaporator. The area we would measure is in the evaporator box, and not accessible for this purpose.
Secondly, who says the system isn't working. You need to consider the chance of a blend door problem. Just because cold air isn't coming from the vent doesn't mean the system isn't working. I've seen cars with sweat rolling off the accumulator and low pressure line to the compressor, and the technician is under the hood scratching his head because no cold air is coming from the vents. If the low side lines are obviously cold, and pressures are within range, we should think about looking inside the vehicle for the problem.
How can I tell if the compressor is bad?
Usually the compressor will show the inability to generate enough suction and pressure at or near idle speeds.
If engine speed needs to be substantially increased to bring pressures in range, that's a sign that the compressor is getting weak. Often the complaint is... only cools when the engine is reved - or - only cools when driving down the road.
Sometimes it's very simple. If we hook the gauges up and see 80 psi on the low side, and 80 psi on the high side, and the compressor hub is spinning, it's likely that compressor is done. It's not producing suction, and it's not producing pressure. We could add or remove refrigerant and still nothing would happen. The compressor must be able to pull a vacuum, and create pressure. Compressors that use a variable stroke are often misdiagnosed as being defective, when only the internal pressure control device is at fault. See: http://www.aircondition.com/tech/questions/53/
How can I tell if the orifice tube is clogged?
A restricted orifice will usually show as very low suction side pressure and lower than normal high side pressure. When the compressor kicks in, the suction against the restricted orifice will cause the compressor to quickly cycle out. After compressor disengagement, the rise in suction side pressure will usually be very slow. Rapid compressor disengagement and slow engagement may indicate a clogged orifice. A clogged orifice tube will starve a compressor of oil.
How can I tell if the expansion valve is bad?
This has to be our least favorite item to diagnose. We've had expansion valves quit working while on the road and show no signs of problem back in the shop. What's worse, an expansion valve can stick closed, stick open, or hang somehwere in between.
Of all the bad expansion valves seen over the years, I think those that stick closed are most common. Those are the easy ones. Gauges will show very low suction side pressure along with lower than normal high side pressure. The low side may even draw into a vacuum. That's a big clue. Those that appear to be stuck closed may have inlet screens clogged with ground up desiccant particles. This will look like beach sand packed into the inlet.
It's common for a defective expansion valve to stick closed, however, the expansion valve can also stick open. This is indicated by higher than normal low side pressure, and slightly higher than normal high side pressure. To some, this might appear as a weak compressor or slightly overcharged system.
<more to come>...